| Key | Value |
|---|---|
| Summary | Learn how to integrate FPGAs with Kubernetes and accelerate the hyperparameter tuning of your ML models. |
| Categories | cloud, containers |
| Difficulty | 2 |
| Author | InAccel info@inaccel.com |
Contents:
- What is MicroK8s?
- What is InAccel FPGA Operator?
- What is Kubeflow Katib?
- What you’ll learn - What you’ll need
- AWS F1 configuration
- Install MicroK8s on Ubuntu
- InAccel FPGA Operator
- Getting Started with Kubeflow Katib
- That’s all folks!
What is MicroK8s?
MicroK8s is the simplest production-grade upstream Kubernetes.What is InAccel FPGA Operator?
InAccel FPGA Operator is a cloud-native method to standardize and automate the deployment of all the necessary components for provisioning FPGA-enabled Kubernetes systems. FPGA Operator delivers a universal accelerator orchestration and monitoring layer, to automate scalability and lifecycle management of containerized FPGA applications on any Kubernetes cluster.The FPGA operator also allows cluster admins to manage their remote FPGA-powered servers the same way they manage CPU-based systems, but also regular users to target particular FPGA types and explicitly consume FPGA resources in their workloads. This makes it easy to bring up a fleet of remote systems and run accelerated applications without additional technical expertise on the ground.
What is Kubeflow Katib?
Kubeflow Katib is a Kubernetes-native project for automated machine learning (AutoML). Katib supports hyperparameter tuning, early stopping and neural architecture search (NAS).Katib is the project which is agnostic to machine learning (ML) frameworks. It can tune hyperparameters of applications written in any language of the users’ choice and natively supports many ML frameworks, such as TensorFlow, MXNet, PyTorch, XGBoost, and others.
Hyperparameters are the variables that control the model training process. They include:
- The learning rate.
- The number of layers in a neural network.
- The number of nodes in each layer.
What you’ll learn
- Deploy and configure instances with MicroK8s on AWS F1
- Install InAccel FPGA Operator
- Install and configure Charmed Kubeflow Katib using Charmhub
- Run FPGA accelerated hyperparameter tuning examples using the Katib user interface (UI)
What you’ll need
- Account credentials for AWS
- Some basic command-line knowledge
What best describes your expertise in FPGA acceleration?
What is your primary job role in your organization?
How will you use this tutorial?
AWS F1 configuration
Duration: 3:00
To interact with AWS services using commands in your command-line shell, you will need aws and jq CLI tools. Install them by running:
sudo apt-get update
sudo apt-get install awscli jq
Add credentials
With AWS you have the option of adding credentials using the following environment variables that may already be present (and set) on your client system:
AWS_ACCESS_KEY_ID, AWS_DEFAULT_REGION, AWS_SECRET_ACCESS_KEY
Launch an FPGA instance
To launch an Amazon EC2 F1 instance, use theaws ec2 run-instances command.
aws ec2 run-instances \
    --block-device-mapping DeviceName=/dev/sda1,Ebs={VolumeSize=32} \
    --image-id resolve:ssm:/aws/service/canonical/ubuntu/server/bionic/stable/current/amd64/hvm/ebs-gp2/ami-id \
    --instance-type f1.2xlarge \
    --key-name <KeyName> \
| jq -r '.Instances[0].InstanceId'
List your instance
You can use the AWS CLI to list your instance and view information about it. The following example shows how to use the aws ec2 describe-instances command to output the PublicIpAddress of your instance.
aws ec2 describe-instances \
    --instance-ids <InstanceId> \
| jq -r '.Reservations[0].Instances[0].PublicIpAddress'
Connect to your instance
ssh -L 8080:localhost:8080 -o StrictHostKeyChecking=no ubuntu@<PublicIpAddress>
Install MicroK8s on Ubuntu
Duration: 2:00The following steps describe how to create, configure and launch a single-node Kubernetes cluster on an Ubuntu Linux system.
You need MicroK8s version >= 1.23 to enable and run InAccel addon.
-
Install MicroK8s by running the following command:
sudo snap install microk8s --classic -
Add your user to the
microk8sgroup.sudo usermod -aG microk8s $USER -
Run the following command to activate the changes to groups:
newgrp microk8s -
Check the status while Kubernetes starts.
microk8s status --wait-ready
InAccel FPGA Operator
Duration: 1:00The FPGA Operator allows administrators of Kubernetes clusters to manage FPGA nodes just like CPU nodes in the cluster. Instead of provisioning a special OS image for FPGA nodes, administrators can rely on a standard OS image for both CPU and FPGA nodes and then rely on the FPGA Operator to provision the required software components for FPGAs.
InAccel FPGA Operator is already built into MicroK8s as an add-on. This means once you install MicroK8s, you can enable InAccel straight away.
microk8s enable inaccel --wait
Note that the FPGA Operator is specifically useful for scenarios where the Kubernetes cluster needs to scale quickly - for example provisioning additional FPGA nodes on the cloud and managing the lifecycle of the underlying software components.
Getting Started with Kubeflow Katib
Duration: 5:00Prerequisites
Your Kubernetes cluster must have dynamic volume provisioning for the Katib DB component. The local storage service can be enabled by running themicrok8s enable command:
microk8s enable storage
Installing Charmed Kubeflow Katib
These are the steps you need to install and deploy Katib with Charmed Operators and Juju on MicroK8s:
-
Install the Juju client.
Juju is an operation Lifecycle manager (OLM) for clouds, bare metal or Kubernetes. We will be using it to deploy and manage the components which make up Kubeflow Katib.
As with MicroK8s, Juju is installed from a snap package:
sudo snap install juju --classic -
Create a Juju controller.
As Juju already has a built-in knowledge of MicroK8s and how it works, there is no additional set up or configuration needed. All we need to do is run the command to deploy a Juju controller to the Kubernetes we set up with MicroK8s:
juju bootstrap microk8sThe controller is Juju’s agent, running on Kubernetes, which can be used to deploy and control the components of Katib. You can read more about controllers in the Juju documentation.
-
Create a new model.
A model in Juju is a blank canvas where your operators will be deployed, and it holds a 1:1 relationship with a Kubernetes namespace.
You need to create a model and give it the name katib, with the
juju add-modelcommand:juju add-model katib -
Deploy the Katib bundle.
Run the following command to deploy Katib with the main components:
juju deploy katibJuju will now fetch the applications and begin deploying them to the MicroK8s Kubernetes.
-
Create a namespace for running experiments, with Katib Metrics Collector enabled:
microk8s kubectl create namespace kubeflow
microk8s kubectl label namespace kubeflow katib-metricscollector-injection=enabled katib.kubeflow.org/metrics-collector-injection=enabled
Katib components
Run the following command to verify that Katib components are running:
watch microk8s kubectl get --namespace katib pods
Accessing the Katib UI
You can use the Katib user interface (UI) to submit experiments and to monitor your results. The Katib home page looks like this:You can set port-forwarding for the Katib UI service:
microk8s kubectl port-forward --namespace katib svc/katib-ui 8080:8080 --address 0.0.0.0
Then you can access the Katib UI at this URL:
Accelerated XGBoost experiments with Kubeflow Katib Hyperparameter tuning
Duration: 7:00
XGBoost is an optimized distributed gradient boosting library designed to be highly efficient, flexible and portable. It implements machine learning algorithms under the Gradient Boosting framework and provides a parallel tree boosting that solves many data science problems in a fast and accurate way.
Hyperparameter tuning is the process of optimizing the hyperparameter values to maximize the predictive accuracy of a model. It is a dark art in machine learning, the optimal parameters of a model can depend on many scenarios. So it is impossible to create a comprehensive guide for doing so. If you don’t use Katib or a similar system for hyperparameter tuning, you need to run many training jobs yourself, manually adjusting the hyperparameters to find the optimal values.
Running a Katib experiment
The steps to configure and run a hyperparameter tuning experiment in Katib are:- Package your training code in a Docker container image and make the image available in a registry.
- Define the experiment in a YAML configuration file. The YAML file defines the range of potential values (the search space) for the parameters that you want to optimize, the objective metric to use when determining optimal values, the search algorithm to use during optimization, and other configurations.
- Run the experiment from the Katib UI, either by supplying the entire YAML file containing the configuration for the experiment or by entering the configuration values into the form.
As a reference, you can use the YAML file of the fpga xgboost example.
Image classification on Street View House Numbers (SVHN) dataset
 Source: http://ufldl.stanford.edu/housenumbers
SVHN is a real-world image dataset obtained from house numbers in Google Street View images. It can be seen as similar in flavor to MNIST (e.g., 32-by-32 images centered around a single digit), but incorporates an order of magnitude more labeled data (over 600,000 digit images) and comes from a significantly harder, unsolved, real world problem (recognizing digits and numbers in natural scene images).
Create XGBoost SVHN Experiments
Click NEW EXPERIMENT on the Katib home page. You should be able to view tabs offering you the following options:-
Metadata. The experiment code name, e.g. xgb-svhn-fpga.
-
Trial Thresholds. Use the Parallel Trials to limit the number of hyperparameter sets that Katib should train in parallel.
-
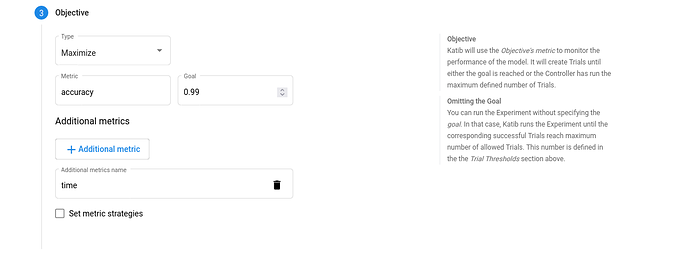
Objective. The metric that you want to optimize. A common objective is to maximize the model’s accuracy in the validation pass of the training job. Use the Additional metrics to monitor how the hyperparameters work with the model (e.g. if/how they affect the train time).
-
Hyper Parameters. The range of potential values (the search space) for the parameters that you want to optimize. In this section, you define the name and the distribution of every hyperparameter that you need to search. For example, you may provide a minimum and maximum value or a list of allowed values for each hyperparameter. Katib generates hyperparameter combinations in the range.
-
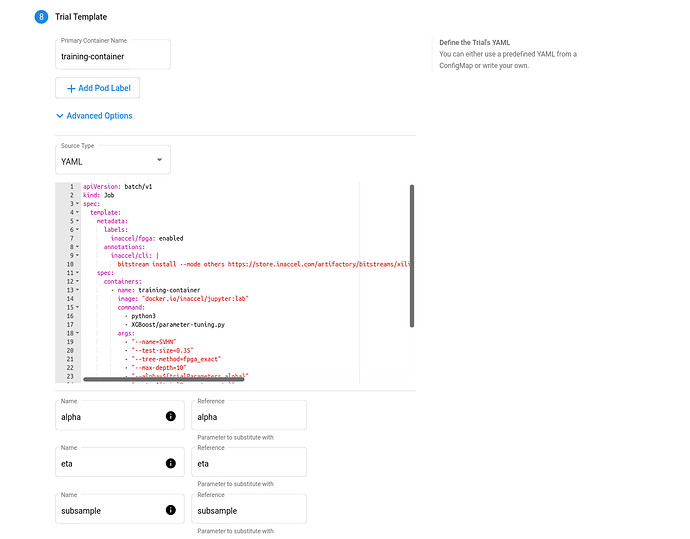
Trial Template. The template that defines the trial. You have to package your ML training code into a Docker image, as described above. Your training container can receive hyperparameters as command-line arguments or as environment variables.
-
FPGA accelerated Trial Job:
apiVersion: batch/v1 kind: Job spec: template: metadata: labels: inaccel/fpga: enabled annotations: inaccel/cli: | bitstream install --mode others https://store.inaccel.com/artifactory/bitstreams/xilinx/aws-vu9p-f1/shell-v04261818_201920.2/aws/com/inaccel/xgboost/0.1/2exact spec: containers: - name: training-container image: "docker.io/inaccel/jupyter:lab" command: - python3 - XGBoost/parameter-tuning.py args: - "--name=SVHN" - "--test-size=0.35" - "--tree-method=fpga_exact" - "--max-depth=10" - "--alpha=${trialParameters.alpha}" - "--eta=${trialParameters.eta}" - "--subsample=${trialParameters.subsample}" resources: limits: xilinx/aws-vu9p-f1: 1 restartPolicy: Never -
CPU-only Trial Job:
apiVersion: batch/v1
kind: Job
spec:
  template:
    spec:
      containers:
        - name: training-container
          image: "docker.io/inaccel/jupyter:lab"
          command:
            - python3
            - XGBoost/parameter-tuning.py
          args:
            - "--name=SVHN"
            - "--test-size=0.35"
            - "--max-depth=10"
            - "--alpha=${trialParameters.alpha}"
            - "--eta=${trialParameters.eta}"
            - "--subsample=${trialParameters.subsample}"
      restartPolicy: Never
-
View the results of the experiments in the Katib UI
-
Open the Katib UI as described previously.
-
You should be able to view your list of experiments. Click the name of the XGBoost SVHN experiment.
-
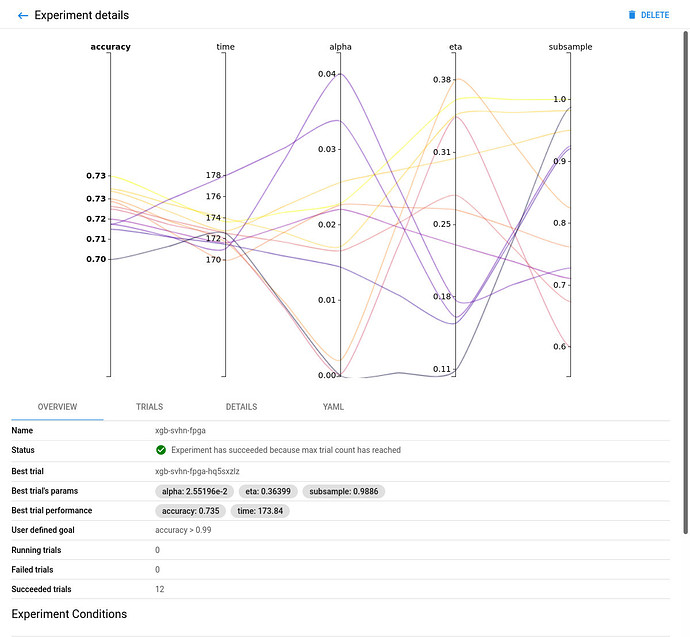
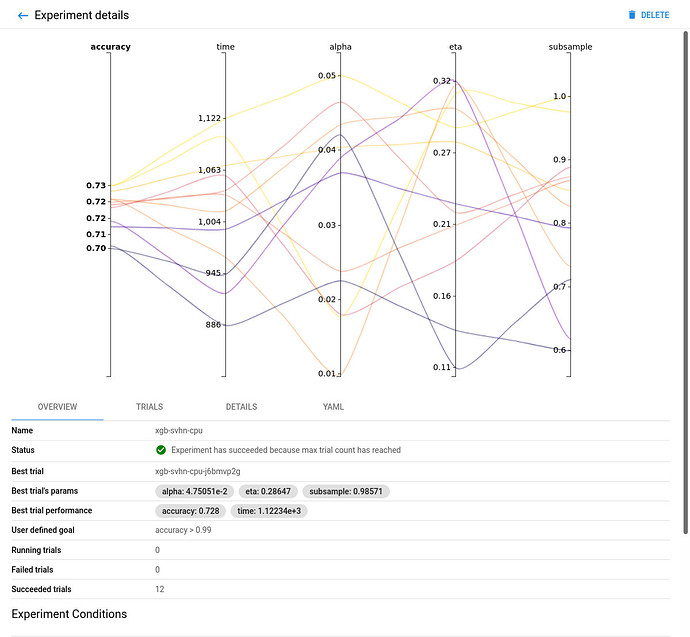
There should be a graph showing the level of validation accuracy and train time for various combinations of the hyperparameter values (alpha, eta, and subsample):
-
FPGA accelerated Experiment Overview:
-
CPU-only Experiment Overview:
Comparing the FPGA accelerated experiment with the equivalent CPU-only one, you will notice that the accuracy of the best model is similar in both implementations.
However, the performance of the 8-core Intel Xeon CPU of the AWS F1 instance is significantly (~6 times) worse than its single (1) Xilinx VU9P FPGA, in this XGBoost model training use case.
-
That’s all folks!
Duration: 1:00
Congratulations! You have made it!
Until next time, exit and stop your FPGA instance:
aws ec2 stop-instances \
    --instance-ids <InstanceId> \
| jq -r '.StoppingInstances[0].CurrentState.Name'
Where to go from here?
Learn more about InAccel and our mission to enable multi-accelerator application models and create a platform to manage it all.Explore the InAccel documentation that has everything you need if you want to look more into FPGA acceleration for your projects.
Alternatively, if you need commercial support for your FPGA deployments, contact us to get all your questions answered.
Last updated 1 year, 1 month ago.


